Goal
Every Pink Floyd fan knows the album Dark Side Of The Moon. Many people who don’t even know the album are familiar with its iconic cover. It’s very simple - it features a diagram of white light being split into a spectrum by a prism. It’s an interesting phenomenon. Those who aren’t familiar with it may wonder how it’s possible - white light isn’t associated with any color, it’s neutral - it can only be brighter or darker. However, as it turns out, all the colors of the rainbow are hidden within it.
Prism
Since I was a child, I wanted to conduct this experiment, but as I got older I forgot about my childhood dreams and many other things lingered on the dusty shelves of the past.
Music
It is said that music soothes the savage beast, but when I played music that I liked for my girlfriend, we quickly got into a conversation about our taste in music. Specifically, we talked about songs that we both liked and could listen to together. Suffice it to say, initially it was a short list that included just DSOTM and nothing else. As it turned out, I started playing Pink Floyd’s recordings from this album multiple times a day. Each time it was an interesting journey, especially when it was played from beginning to end.
Cover
To complete the experience, at some point, I was struck by the idea that perhaps the diagram of the split light does not accurately represent the actual color components of white light. I had only seen the cover on a smartphone or computer screen. As we know, colors on such screens are created by combining red, green, and blue. The human eye is sensitive only to these colors, so it happens that in this way it is possible to “trick” the visual organ into seeing a color like yellow when there is no wave of light with the corresponding length to the yellow color in the emitted light from the screen. So we can say that we see that color, but it’s not really there.
Violet
Basically, it’s not a big problem. From experience, we know that “tricking” the eye by modifying the intensity of three colors to be able to see millions of colors works very well. It’s difficult to say that there’s not enough color while browsing the internet or doing anything else on a screen. Nevertheless, I wanted to conduct this experiment, to experience my own little rainbow and determine for myself if I was missing anything. The most interesting part of it all turned out to be purple - the color at the very end of the spectrum. It cannot be experienced on an electronic screen. For one reason or another, the source of blue light has a longer wavelength - it is bluer. In natural conditions, of course, that color exists - it’s kind of an ink color.
Setup
To conduct the experiment, I ordered the necessary components:
- Prism
- 10W 12V halogen bulb
- Power bank
- 12V USB-C Power Delivery terminal
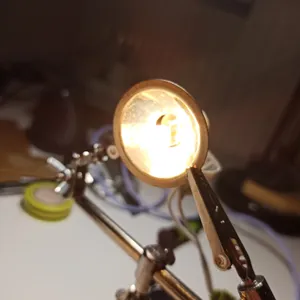
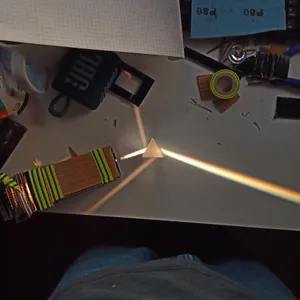
To be able to observe the splitting of light, it’s important that the light beam that falls on the prism isn’t too large (cross-section) and that the rays of this beam are parallel (as much as possible). In the first iteration of the prototype, to obtain a parallel beam of light, I enclosed the bulb in a box. I made a hole of a few millimeters in diameter in it. The bulb was positioned several centimeters away from the hole so that the rays that emerged from it were approximately parallel.
Setting up the prism
As it turned out, it was not an easy task. In such improvised conditions, with initially low brightness of the beam, obtaining the splitting of light was quite challenging. I had to adjust the prism a bit to get the angle and location of the beam hitting the prism right.
Observations
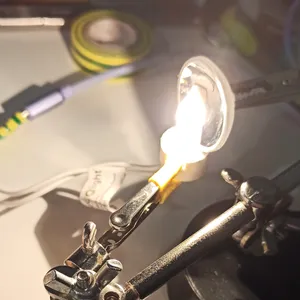
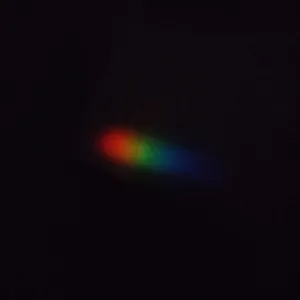
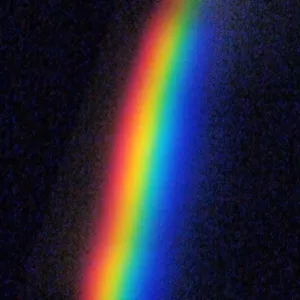
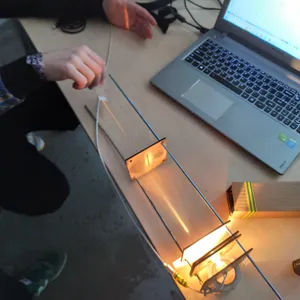
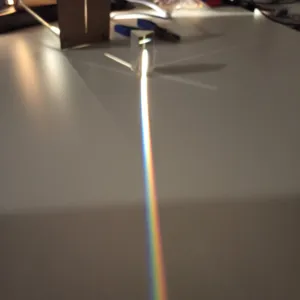
Initially, I observed the split light on a sheet of paper. It was satisfying at first, but I wanted to see more. I decided to look directly into the prism. I quickly estimated in my head that the bulb had a power of 10W and that I wouldn’t blind myself by looking directly at it. Additionally, the split light was just a fraction of the light passing through the hole in the box, which in turn allowed only a fraction of the total light generated by the bulb. In summary, I concluded that it would be safe for my eyes.
Looking at the spectrum
Directly experiencing the spectrum is something that I recommend to everyone. The entire spectrum was a few centimeters long. I moved my head from right to left and the colors changed. It may seem like nothing big, but the colors were pure, separate yet connected. It’s hard to say if from a physiological point of view there’s a difference between looking at yellow generated by a smartphone screen and looking at yellow as part of the spectrum. I suppose not. But my impression and experience of the spectrum as something real and existing was an important complement to DSOTM. There, I also noticed the purple color that I mentioned before, which is difficult to see in other conditions, especially in such purity.
System drawbacks
Firstly, there wasn’t enough of the rainbow. It could only be seen in a dark room. Ultimately, I wanted to have an interactive decoration that could be admired not only in the dark. Secondly, I had a point light source - it would be difficult to visualize it on the screen in a similar way to the DSOTM cover. Thirdly, the setup was quite large and not very compact, making it impractical to use as decoration.
Improvements
An important feature of the setup for me was the battery-powered operation - so it wouldn’t be necessary to connect it to the power grid during use. Hence, the 12V voltage of the chosen bulb.
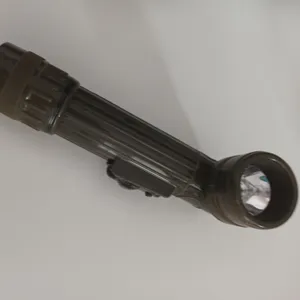
Bulb
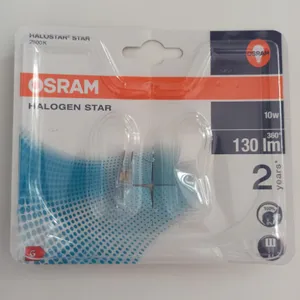
I tried a stronger bulb - a 20W one - but for unknown reasons, the power bank would shut off - even though theoretically, it can supply up to 30W (including approximately 2A at 12V), so it should work. Perhaps it has to do with the fact that the bulb has lower resistance when turning on (warming up) than when shining, therefore, it requires more power and amperage. Maybe it’s an entirely different issue related to communication between the power-delivery terminal and the power bank. Anyway, I decided to stick with the 10W 12V halogen bulb with a G4 connection.
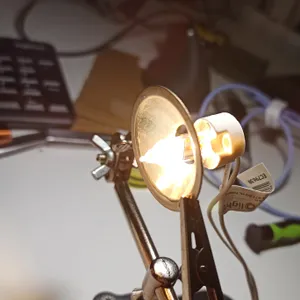
Mirror
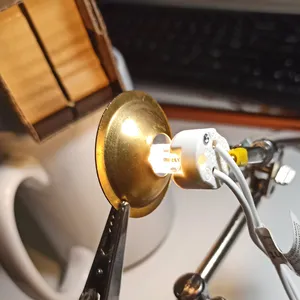
To increase the intensity of the light beam without increasing the power of the bulb, I decided to use a reflector. For this purpose, I bought two flashlights and a parabolic mirror. From a practical point of view, the most sensible choice was to use the reflector from an old signal flashlight. It was just a piece of stamped metal with a hole for the bulb in the middle. The mirror from the second flashlight was made of plastic and melted from the heat of the bulb. The parabolic mirror initially seemed the most promising. It had a very smooth surface and seemed to have a glass coating, but the lack of a hole in the middle made it more difficult to use in the setup.

Lens
I also asked in the hackerspace if anyone had an idea for improving the circuit, and one of my colleagues suggested using a lens. It seems quite reasonable. But I don’t have a lens and I decided not to pursue that route for now.
Slit
Here, I was inspired by optical setups used in school experiments. I noticed that a prism typically has a slit on one of its faces. By using a slit instead of a circular opening, I get more rainbows :)
Iteration 2
Using the improvements I mentioned earlier, I built another cardboard circuit using hot glue. It worked surprisingly well. There were only two remaining issues - the inability to adjust the reflector’s position relative to the bulb, and the imprecise dimensions of the slit (cut with a wallpaper knife in cardboard). So, I decided it was time for another prototype.
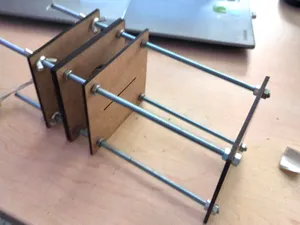
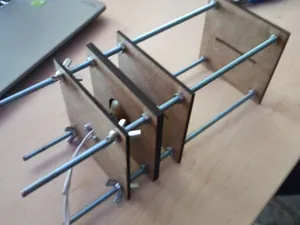
Iteration 3
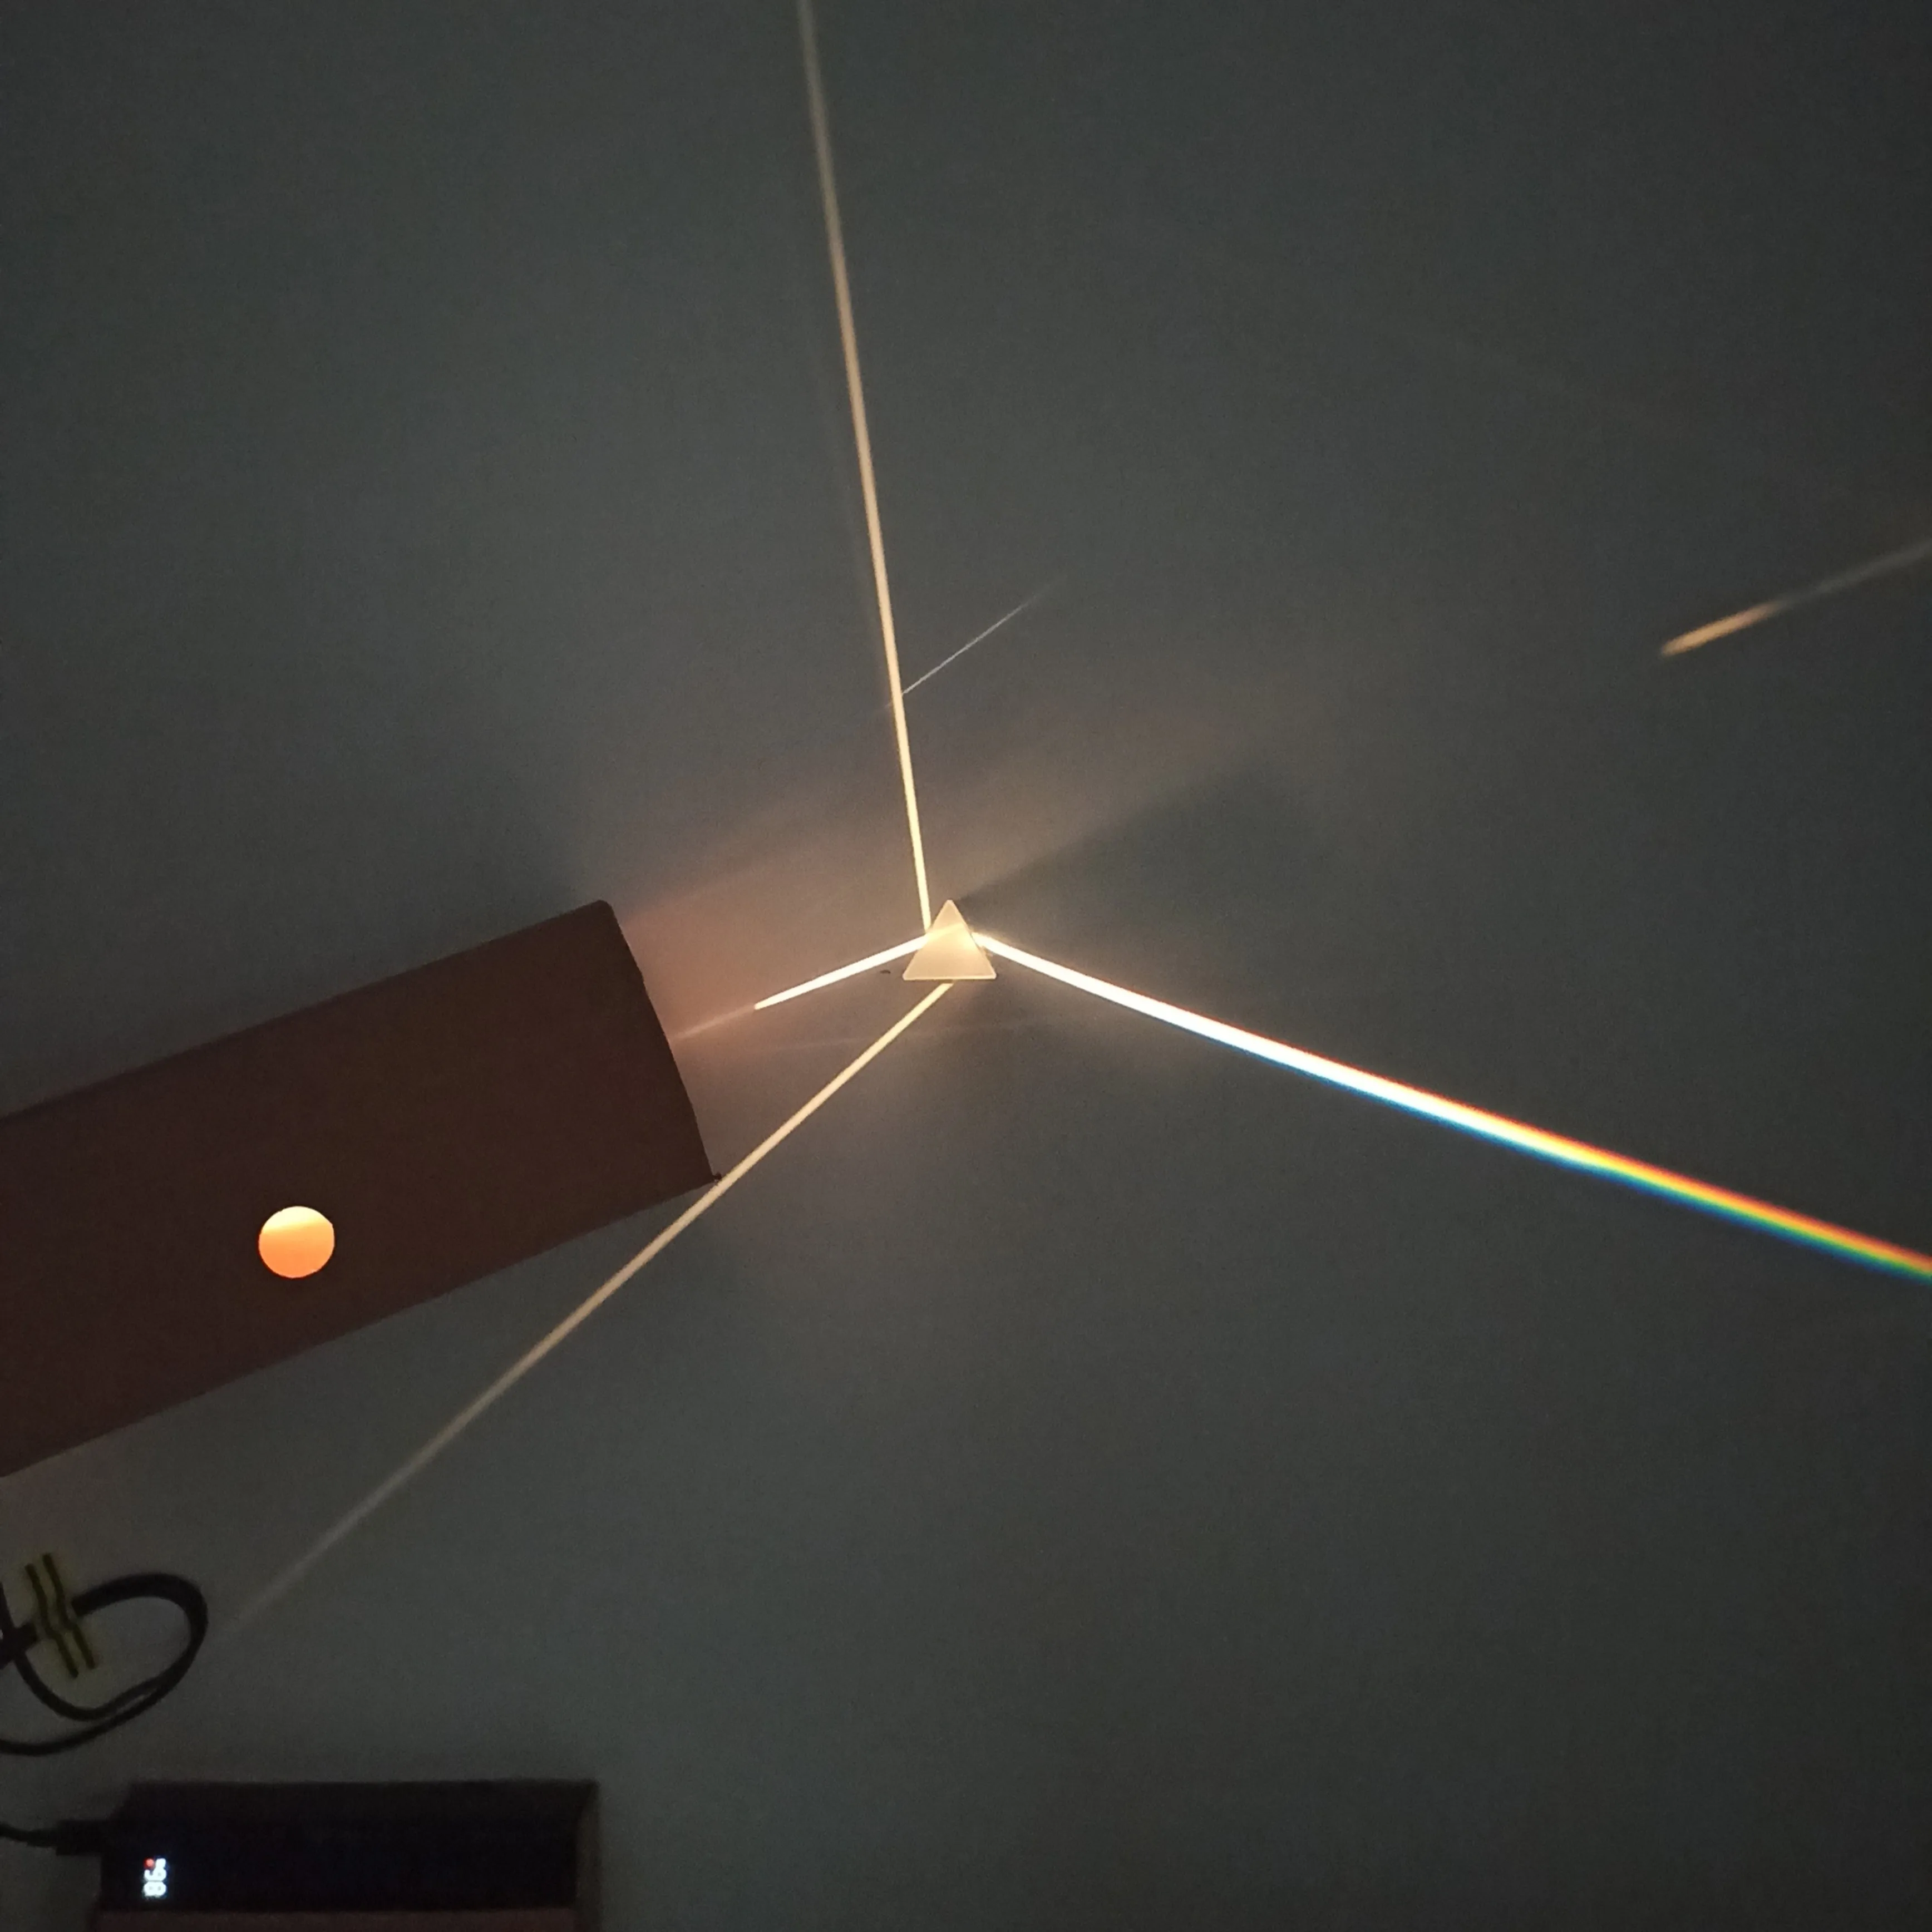
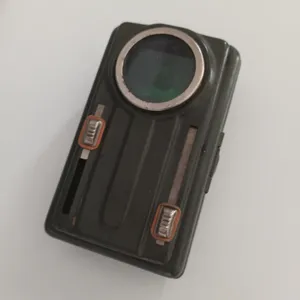
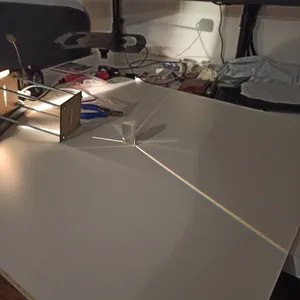
I went to the hackerspace. Here it is worth mentioning the very helpful members of this community. I wanted to cut something with a laser on a 2mm HDF board - and “boom”, there was a friend who showed me everything and now I know how to use this machine. The designs were quite simple and are in a public repository on GitHub. The whole thing consists of five 9x9cm squares laser-cut into the HDF board, each with the appropriate features. Two squares are used for beam formation - both containing a slit 1mm wide. The next two squares are mirror holders. The final square is a holder for the G4 socket in which the bulb is placed. The whole thing is held together on M5 threaded rods. It turned out surprisingly well - I managed to solve the biggest problems from iteration 2 - the slit was precise, and I had the ability to adjust the mirror position relative to the bulb in such a way that it was at approximately its focal point.

Finalization
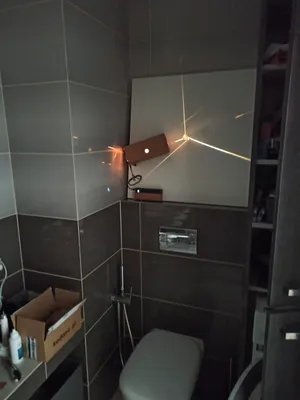
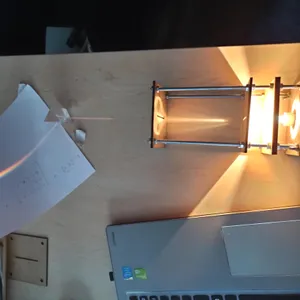
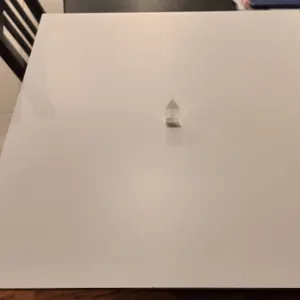
I thought maybe I could improve it even more, but the consensus was that it was good enough, so I decided to move on to the final phase of the project. To do this, I bought a white furniture board measuring 70 x 70 cm. Using hot glue, I mounted the prism, light source, and power bank on the board. I connected the wires, and voila - everything worked more or less as I had imagined. The problematic part was where to place this decoration. My apartment is not that big, and I can’t drill holes in the walls without asking the landlord. So, I temporarily placed the decoration above the toilet, and it got a new name - “Dark Side Of The Piss”.
What’s next?
Maybe someday I’ll improve it, but for now, I consider the project closed. One of my friends who is into music was inspired by my project. He recorded an intro rhythmically similar to the beginning of “Money” from DSOTM. Instead of using sounds associated with money, he used sounds associated with the placement of the decoration.